Mission: Finish installing crown molding around the rest of the house (with the nursery done, we still had the guest room, the playroom, and the hallway on our list).
Status: Complete.
And thanks to the magic of the internet, something that took us about two weeks on and off, will appear to have been done in two seconds. Behold.
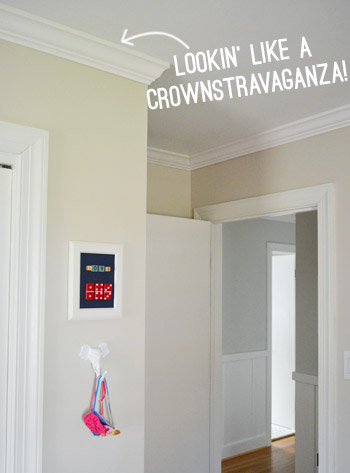
Yep, as I mentioned in this post about hanging crown in Clara’s nursery, it ignited a burning desire to install crown in the other main areas of our house that were oddly missing it (our bedroom had it but the other bedrooms didn’t, one hallway had it but the other one that was connected to it didn’t, etc).
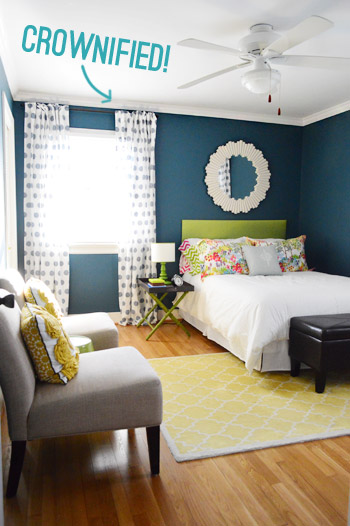
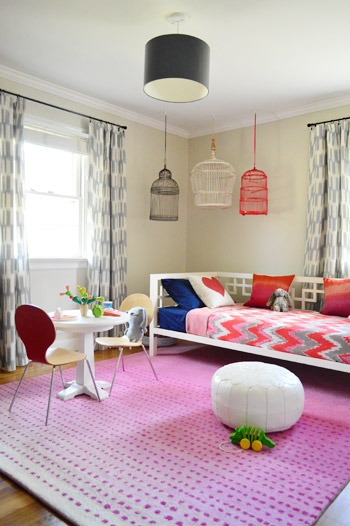
So we finally got it done in the guest bedroom (see above), Clara’s big girl room (see below)…
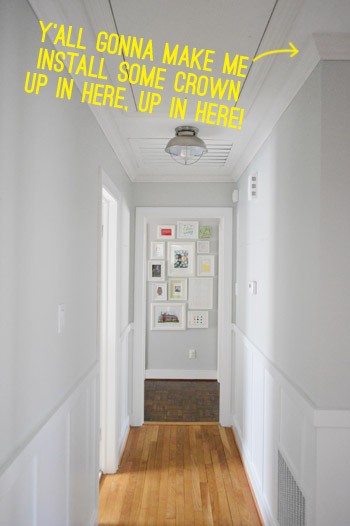
… and even the recently-board-and-battened hallway that connects them all (which was especially helpful since it leads to another hallway that has crown already).
Although it took us about five days of on and off work to install, once we got the hang of it, it wasn’t nearly as mentally strenuous as it was physically (arms over your head holding an eight foot board up for a few days in a row = tired). Our total cost for all four spaces (guest room, Clara’s nursery, playroom, and the hallway) was $218, including the pack of nails for our nail gun, which breaks down to $54 per zone, although some areas like the hallway were cheaper than the bigger rooms.
And while it’s kind of hard to illustrate the difference in pictures, in person it’s easy to see that all the time, arm-fatigue, and loot was worth it. Every room looks noticeably more polished, but in that “I can’t really put my finger on what’s different” sort of way. In fact you saw a lot of the molding installed in our recent house tour video, it just wasn’t painted yet, so we finally got around to that. Which involved a lot more of the whole arms-over-our-heads things, but it looks great now that it’s done (we used Benjamin Moore’s Decorators White in a semi-gloss finish).
Since we already did a photo tutorial of the crown installation process, we decided to use this portion of the project to make a video for you guys (sometimes DIY videos can be less intimidating than trying to digest typed out words and pictures that can’t always show every last angle like a video can). We tried to cover every single step and cram in as many little tips and tricks as possible along the way for you guys. Seriously, you can do this. So from measuring your angles all the way to caulking the gaps, it’s all here:
Does anyone else smell Oscar? No? I’m not talking Best Picture – I mean Best Supporting Actor for the role of “intense bird screaming in the background while filming” during the outdoor sequences. Ah, spring.

Looks great! Crown molding is one of those things that is a pain in the butt, but once it’s done, it elevates the entire house! Congrats on finishing it!
I’m curious as to why you didn’t paint before installing?
We just thought that cutting it and nailing it in would create a lot of dings (it did) that we’d have to touch up anyway, although it probably would have made it easier and faster in hindsight. Next time!
xo
s
I have bookmarked this bad boy because that video ROCKS! (Bird and all!) I know we’re going to venture into doing crown ourselves when we finish the basement and I’d like to do it ourselves. Our friend did the rest of it and while I’m so thankful, I think there are a lot more joints than there should be because of miscalculations. Your vid makes me feel like we’ve got a good shot and I’ve wishlisted the dohicker from Lowes. (Dohicker IS the proper term, yes?) :)
Thanks Anele! I really think anyone can do it, and I hope the video helps.
-John
I fondly remember helping my parents paint and hang crown molding as a teen. They were elated when it was done.
Ah, good times…
Oh yeah, it feels like there should be a parade or a dance party when it’s done. Or at least a giant platter full of tacos.
xo
s
Haha, completion of crown molding = giant platter full of tacos.
I. Love. It.
If any of you came and installed crown molding in my house, I’d make you as many tacos as you wanted! Sounds like an awesome deal to me! :)
I am so glad to see that installing crown is not hard. We just finished new baseboards and not we need to start on crown.
ps Clara’s room makes me happy:)
http://thedomesticlady.com/2013/04/17/home-improvement-stenciling-the-great-wall-before-and-after/
love the difference in makes!
Tot has that alligator too. Only his face just fell off. Distressing!
Also, the crown looks great. :)
Oh no! I won’t even ask how that happened…
xo
s
I never thought crown molding would make such a difference, but wow!
I’m so jealous of your guest room… I think it’s my favorite room so far.
Aw thanks Carla! Come over and stay :)
xo
s
This video is a great how to thank you! I am off to pin this post!
So glad! We tried to cover every last detail for ya :)
xo
s
Thanks for the video! We are just getting ready to put down some baseboard … Love the colors in this room!
it looks awesome, you guys!
man i always love that wall color in the guest room… and everything else about the room too. so great. and now the crisp, white crown against the peacock blue wall?! glorious!
BEAUTIFUL! Thanks so much for the video!
I love all the crown moldings added! Very nice. It does make the rooms seem more finished. We want to do this to our home but it’s going to be put on hold for some time. You know, I’m looking at Clara’s new room (aka the playroom) and maybe this is stupid to even bring up but that darker birdcage (is it ORB maybe?) would look so pretty in a lighter pink that’s in the bedding. Just a random thought. Lookin’ good, good looking!!!
Ooh that would be fun too!
xo
s
We so need to do this to our house. It really completes a room.
Yay! We have crown moulding installed upstairs but it’s still not caulked and painted. I have caulk anxiety! Deep breath, deep breath. On the one side, I’m in my sister’s wedding in a few weeks, it’d probably help tone my arms, hah!
It TOTALLY will! I woke up with spaghetti arms for like four days.
xo
s
Ha! My sister’s wedding is also in about 4 weeks…and I’d love to install crown molding in my house. Maybe we could enlist this as a pre-wedding toning exercise program!
Haha! Seriously. I smell a bachelorette party activity…
xo
s
That was a great video! Definitely makes me feel like I could attempt this. But I do have a question, unfortunately we have popcorn ceilings. Can you think of any problems this might cause when trying to attach molding? I was thinking the molding might not be able to fit completely snug to the ceiling, but caulk should remedy that, right?
I don’t think it would cause any problems other than when you caulk along the top it’ll smooth out the area where the crown meets the popcorn for a nice seamless look, so this exact method (including the caulking) should work!
xo
s
Hey Laura!
A friend of mine recent installed crown in her dining room (which also had popcorn ceilings). Before installing the crown, they went around the room with a small paint scraper and knocked off the bigger chunks of popcorn that would be in the way of the crown. It seemed to work pretty good and also reduced the space she had to fill with caulk. Good luck!
Smart!
xo
s
Hi Laura,
If you do scrape any popcorn at all, make sure you have it tested for Asbestos before you loosen or scrape any! Our popcorn ceilings were recently removed and we had to have a certified abatement company come in and take care of them because there was 4% asbestos present!
I bet that crown molding is going to look great!
Eeks, great tip Caitlin!
xo
s
Is there a YHL discount code for the Brushed Nickel Fan in your house?
Many thanks.
Hmm, the tabletop one in our bedroom? We have a white ceiling fan in our sunroom and guest room, so we can’t think of any others (beyond that table fan, which is from Bed Bath & Beyond, so you could use a 20% off coupon from a magazine/the mail). Hope it helps!
xo
s
It may have been answered. But what color of blue is that?
Love love love!
Great job on the crown molding! Always makes it look more finished!
Thanks Betsy! It’s Plumage by Martha Stewart (similar to Dragonfly by Benjamin Moore, which is on the back of our built-ins in the dining room). Hope it helps!
xo
s
Perfect timing! We’re doing this soon starting with the guest room and moving though the house. It was built in 1890 so the Kreg tool is a great tip to get the corners right and help! Thanks so much!!!
Oh yes, it’s a huge help with non-perfectly-square-walls (our hallway was crazy and completely not square).
xo
s
Yay! I bet it feels great to finally have that job accomplished (aside from the sore arms)!
I’d love to add crown throughout the Little House, but we’re not sure if it would be worth the investment.
Hi guys. Just curious as to how you decided on the crown moulding you chose… there are so many types!! And it’s silly to say but too many options gives me commitment phobia delaying projects almost indefinitely. *blushing*
We decided to use the same thickness that was already in our bedroom, dining room, office, etc (we just measured how thick it was and picked up the most similar kind we could find). That way it’s not bolder or thinner in certain areas. If it helps for reference, our crown is around 3.5″ wide. Hope it helps!
xo
s
John and Sherry, thank you SO much for making this video. I lurve me some crown molding, but every time I think about installing it and figuring out angles and such, my brain has a mini-implosion and I decide to think about it another time. The video is incredibly helpful and I honestly think I can tackle this now! Again, my many many thanks!
I know what you mean! This was our first time installing crown to multiple rooms ever (we did some in the kitchen last year but without the right tools it was a total headache) so we figured now that we had an easier method down the video would hopefully help. Good luck with everything!
xo
s
You guys were certainly busy! Congrats on getting it all done- looks great :)
Thanks Kate!
xo
s
I love the finished look crown molding brings! It looks gorgeous! If we had white trim I’d add it, but I don’t think it’d pair well with our existing wood trim.
Love the way it looks!!
But what happened to the new mobile view of the blog that was here yesterday?!
We had a few kinks to work out and got more complaints than we’d like, so we disabled it until we get things worked out. Hopefully soon!
xo
s
How much did the job cost?
That’s in this post for ya, but here’s an excerpt: Our total cost for all four spaces (guest room, Clara’s nursery, playroom, and the hallway) was $218, including the pack of nails for our nail gun, which breaks down to $54 per zone, although some areas like the hallway were cheaper than the bigger rooms.
xo
s
It looks great. What do you do in a room that has a slanted ceiling on a couple of sides?
Hmm, I’m not sure. Maybe try Pinterest or Google Images to see if there are some inspiration pics? Maybe add some pretty beams instead of molding if molding would look odd?
xo
s
I was wondering the same thing until I stumbled upon a magazine photo several days ago that put decorative wood pieces into the corners so that the corners of the crown moulding didn’t have to line up. The corner pieces were tapered in a decorative way at the bottom.
The crown looks great; you guys have done so much to your home in two + years. It’s been a joy to follow your projects and antics along the way. This is my fav design blog and I read YHL everyday. Sherry: the bird cages in the Big Girl’s room resonate as a little off to me; you know: “in the middle”. Not. Quite. Perfect. What if the big white middle one was hung a bit higher, the left bird cage hung very low and a third bird cage that is smaller in scale than the other two, hung at mid length. Also, I can envision bold fabric cord covers for each to brighten up that corner even further. Well, just a suggestion. Love the crown; love YHL. When you gonna write another book?
Thanks so much Shelly! I’m sure things will evolve in there like every other room, so since it was just recently put together we can’t wait to see how things grow/change/get tweaked. As for another book, ahhhhh – not ready! Haha. Maybe in a few years we’ll have another one out :)
xo
s
Adding “install crown molding” to my ever growing list of things to do! Can you guys slow down, I can’t keep up haha :)
Haha! We’ve got ants in our pants since we did all that traveling (couldn’t wait to get home and tackle more stuff!).
xo
s
I laughing-out-loud lost it at work just now with the “y’all gonna make me install some crown, up in here, up in here” part. i immediately thought of those fierce faces you were pulling in the april fool’s rap video and it was “diy-related rap” gold! so thank you for the good laugh this morning!
Haha, sometimes you just have to get silly after hours of nail gunning and painting :)
xo
s
I love me some crown molding! It really finishes the look of a room. Great job.
awesome! Most of our house has 10 inch thick crown (amazing, 100 year old craftmanship) but then we have rooms that are completely naked! Later additions. No one should be left naked out in the cold. This is good inspiration to get crackin! :)
Thanks for the video! I have read all your tutorials but seeing it done live is very helpful. Could you provide the information about your saw? Perhaps a link if possible? Thanks so much!
Oh yes, the miter saw is from Sears and it’s made by Craftsman (John’s dad bought it and we paid half to have “joint custody” of it, haha!). It was purchased a while back, but this saw seems really similar: http://www.sears.com/craftsman-10inch-mitermate-trade-miter-saw-21226/p-00921226000P?prdNo=6&blockNo=6&blockType=G6
xo
s
Maybe I can use this video to convince my husband to do this for us (ok, me)…. :)
Haha, good luck Berennisse!
xo
s
“The angle finder helps you find your angle…Surprise!”
That made me laugh out loud. Totally going to start saying Surprise! about random things. So funny!
Haha, I was totally trying not to laugh when he said that. I think with a camera in our face, we lose 50% of our marbles. Haha.
xo
s
Thanks for this post! This project is on my to-do list. When you caulked the molding, did you do it across the entire ceiling, or just the spots that had gaps?
We just used it where there were cracks and gaps, so we squished it in anywhere there were, and then once we painted it all looked seamless.
xo
s
As I was scrolling through this post, my 6 year old daughter was standing beside me. As I passed the picture of Clara’s room, my daughter gasped and said “Go back, go back!” She then proceeded to go bananas over Clara’s room, saying: “It’s so cute!, It’s so pretty! I want to go there!” When I asked, she even confessed she likes it better than her (I think very pretty) room. I was so surprised! (Not because Clara’s room isn’t totally great, but because I thought my girl loved her room that is very different from Clara’s). I guess when it’s time for a re-do, we’ll be browsing houzz.com TOGETHER :) She obviously has style opinions of her own and that is lots of fun!
Aw that’s so sweet! I love that she has the decorating bug :)
xo
s
Thank you so much for taking the time to make this video! I have been living in my house for going on 6 years, and while I love our 10-foot ceilings in the living and dining rooms, the fact that they don’t have crown molding makes them look bare and unfinished. I have wanted crown molding for those rooms for quite a while, but don’t have the funds to hire someone (people charge at least $2 a square foot around here), and didn’t have the confidence to try it myself, with all the angles and what-not. When you first wrote about the Kreg Crown tool, I had a glimmer of hope that I could maybe try it, but still had the fear of it being a huge distaster. Now that I’ve seen it in practice on the video, I feel confident I can pull it off, even with the exhausted arms that follow! :D Thanks again!!!
You can totally do it Stephanie! Good luck!
xo
s
Opinion to ask you? Most of my trim and door molding is wood, but woudl love to install some crown in the bedrooms – woudl you suggest painting the crown the same white color as the ceiling? def would not want a wood toned crown….
Would love your crown molding expert advice! :)
Oh yes, we’ve seen rooms with white crown and ceilings with wood trim and door molding. We’ve also seen it all white and all wood, so I think there are a number of ways you could go :)
xo
s
I will definitely take this as inspiration since I am terrified of crown molding. All the horror stories I hear. But now I am all “I think I can, I think I can!”
Haha, you can!
xo
s
Y’alls video is great. My mom and I are about to hang crown molding in my parents room so this is a big help :)
Hilary
So glad! Good luck Hilary!
xo
s
Looks great!! Beautiful job!
Thank you so much for this great instructional video. A contractor wanted $1700 to hang crown in one day in my house. I have been afraid to try it myself….until now!!!
Woah! That’s a ton of money! Hope you can save lots of loot :)
xo
s
Great video, thanks!! Fill it with caulk…that’s what she said! Gahh I couldn’t resist. 6th grade humor. At some point I started always pronouncing the ‘l’ in caulk to avoid giggling uncontrollably while discussing said projects with husband.
Haha, oh yes we exaggerate the L in caulk around here too. #nevergrowup
xo
s
Ahhh great tutorial! You’re making me feel like maybe, just maybe, I could do this! Unfortunately my hubby is DIY-phobic so getting him on-board could be a challenge!
Love the bird in the background, at first I was wondering what you meant by the screaming as I couldn’t hear it… then it started! Love that spring is finally here, screaming birds and all!
P.S. John’s a total hottie in his safety glasses! ;-)
Wahoo! Yeah he is! Must’ve been why all the birds were whistling at him!
xo
s
Looks great! I’m gonna pin it!
Love the way this updates/changes the look of these rooms! I mean, they were all gorgeous already, but the crown molding adds just that little extra finesse. :)
Question (and if you’ve answered this before I do sincerely apologize!): how tall are your ceilings? I love the look of crown molding, but I’m afraid our standard height ceilings (maybe 8ft, if that? They definitely aren’t “tall”) wouldn’t look right with it. We have a 70s house which, in some ways, mimics yours, and since I love the look of it in your rooms I’m thinking about giving it a shot in ours. Thanks for the inspiration!
Ours are standard height (8 feet) and our house is a 60s ranch. Hope it helps :)
xo
s
Nice, thanks! (My hubby thanks you too, I’m sure, haha). I promise: tacos will be served upon completion :)
Hahah!
xo
s
Looks great and definitely adds the final touch to each room. Our upstairs consists of all vaulted ceilings. Do you have any posts/suggestions for elevated/angled ceilings? To decorate above the “door line” or not to? That is my question! :)
Hmm, maybe add some decorative beams? Or a cool shelf up there? Generally I think it keeps a room cozy to have art and things hung at eye level and not super high into the peak. Hope it helps!
xo
s
Hi AnnMarie, I have vaulted ceilings too & I pinned this recently. Looks like a good tutorial with lovely results.
http://www.sweetpickinsfurniture.com/2011/09/easy-diy-faux-beams.html
Thanks so much for all of your attention to the details in these videos and tutorials! It definitely is a huge “DIY Confidence Booster!” for the rest of us :)
I know you stated that you worked for 5 days off an on to finish these areas, do you mind guesstimating (can’t believe spell check didn’t ding me for that one…guesstimate is actually a word?!) just how much time was spent “on?!”
Thanks! :)
I would say maybe 2 hours installing per room and then an hour caulking and painting.
xo
s