This isn’t “Deckgate” in the sense that there’s a scandal involving a deck (sorry Olivia Pope) but for anyone who might want to learn how to build a literal deck gate, well, this could help.
Our previous method of deck “gating” could be considered a little… lacking.
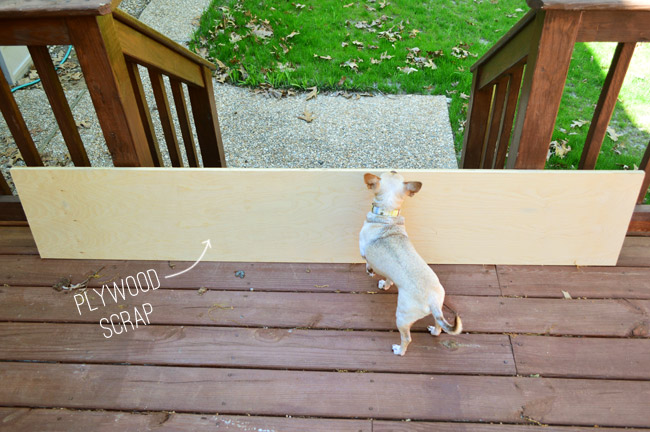
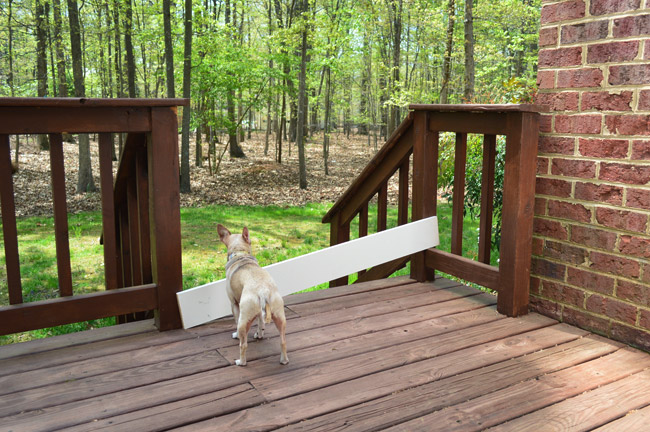
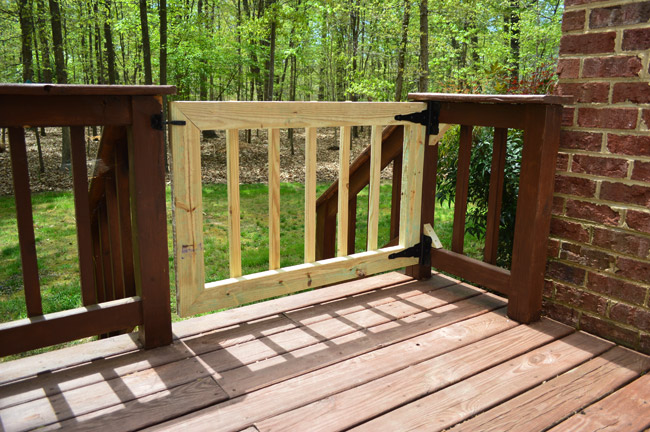
The nice weather has accentuated a shortcoming of our deck once again. Burger likes to sunbathe out there, but the temptation of a grassy yard full of bugs and fascinating smells often proves too great and he goes wandering. We don’t have a fence on our property, and he has gotten more brazen lately and may even wander into the neighbor’s yard. Hence the classy plywood barrier on one side and the leaned board on the other (yes, that was enough to keep him deck-bound).
Clearly some gates were in order, since we didn’t want to deny Burger his precious sun time but knew with a newborn that policing his whereabouts could fall through the cracks. I read a couple of tutorials online that were particularly helpful (this one and this one), then I took some measurements, sketched out a game plan (I modified both plans a little), and hit up Home Depot. Here’s what I came home with:
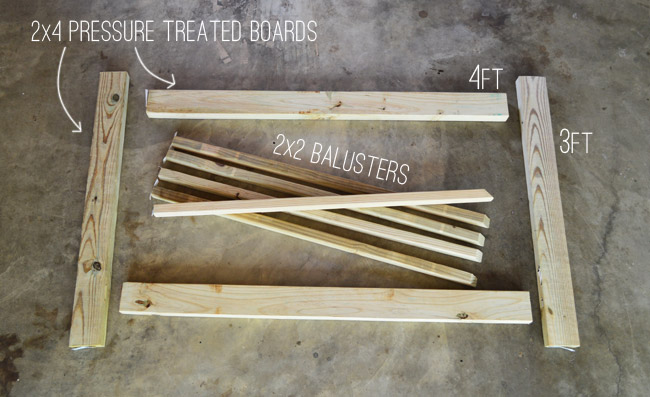
I was making two gates, so picture these supplies twice over.
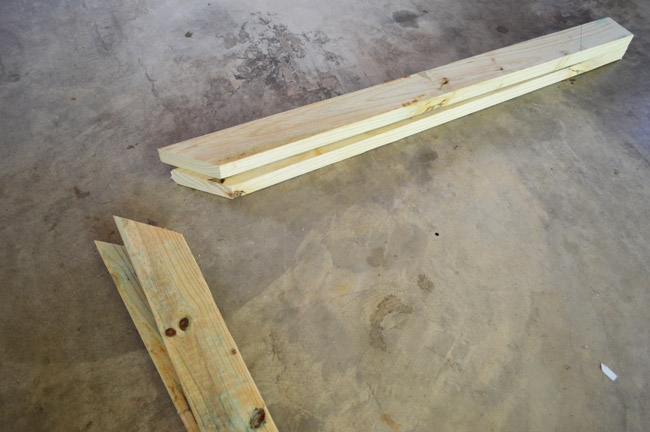
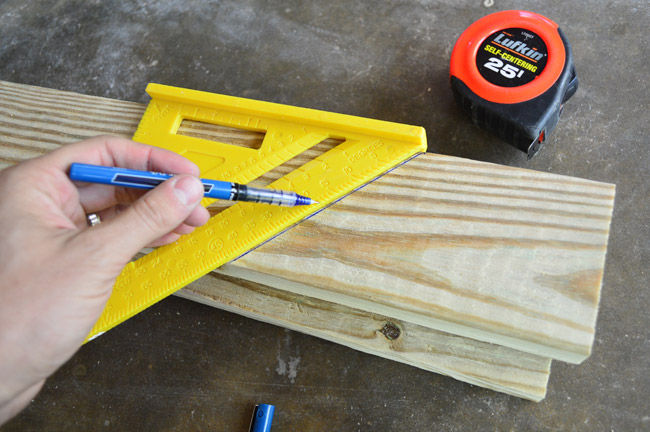
To get everything I needed, I purchased two 10′ boards (cut into 3′ / 3′ /4′ sections) and one 8′ board (cut in half). The lengths above were just the rough cuts I got at Home Depot to make everything fit into the car more easily, but I knew I’d need to cut my own mitered corners at home. So I started by cutting 45° corners on one end of each board.
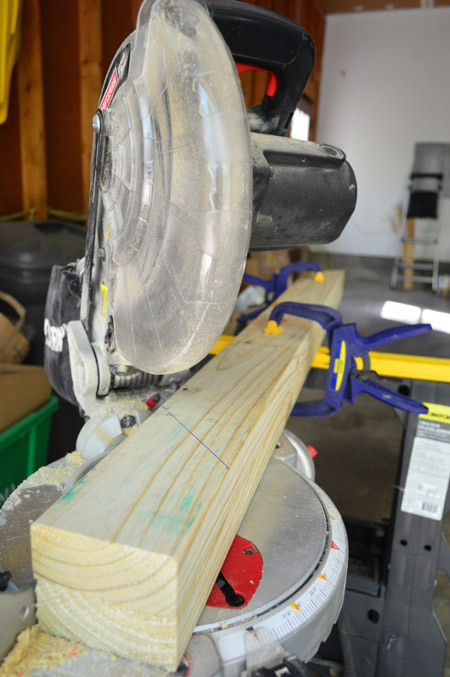
Making the second mitered cut was where I had to be precise on my measurement. I knew I wanted the gates to be an inch shorter than the length of the opening (to give them room to swing) and about the same height as the rest of the railings around the deck. So I marked my lengths and even drew the angle on the board so I was sure I was cutting each one in the right direction. This particular gate was 44″ wide and 29″ tall.
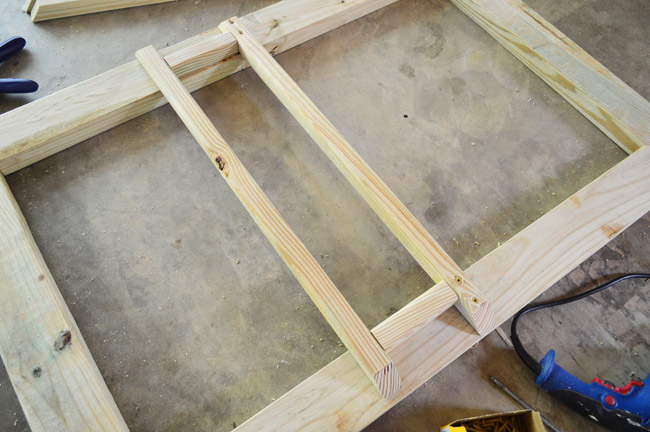
I cut the boards in pairs: the top & bottom boards together, and the two sides together. This ensured that the pairs were identical lengths, which was key to getting my gate all square in the end (so I carefully clamped them together before making the second 45° cut on the opposite end).
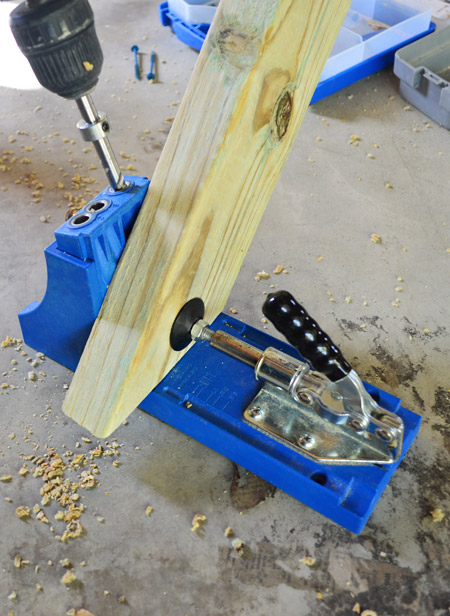
To join my frame together, I used my Kreg Jig to create two pocket holes on each end of the side boards. These are holes I’d later fill with wood putty.
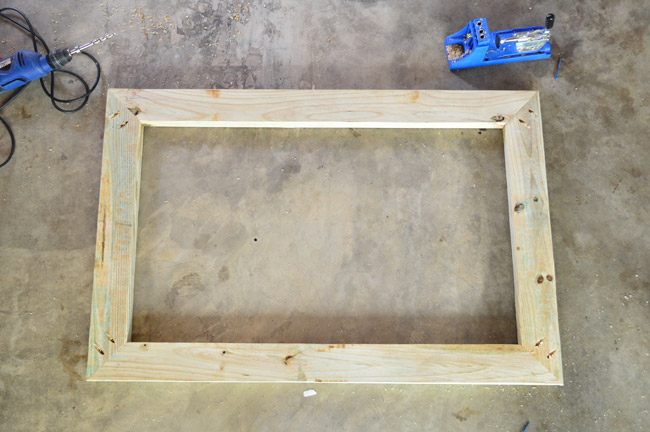
So here’s my frame after everything was screwed together nice and tightly.
Next I had to attach the balusters to mimic the look of the rest of the deck’s railing. Before shopping I had measured the spacing between the existing balusters and determined I’d have space for five of them on my gate. So after cutting mine to length, I attached the first one at the center point of my gate on both the top and the bottom – using two 2″ decking screws (remarkably still left over from my deck project at our last house). Then I used some scrap wood to cut spacers to help me place the next balusters evenly. You can see those in this shot:
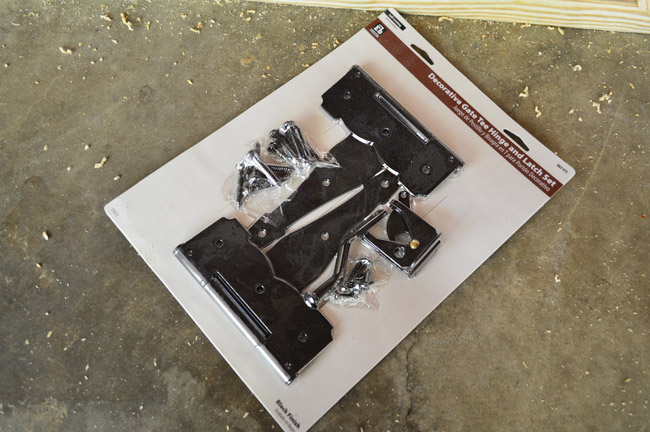
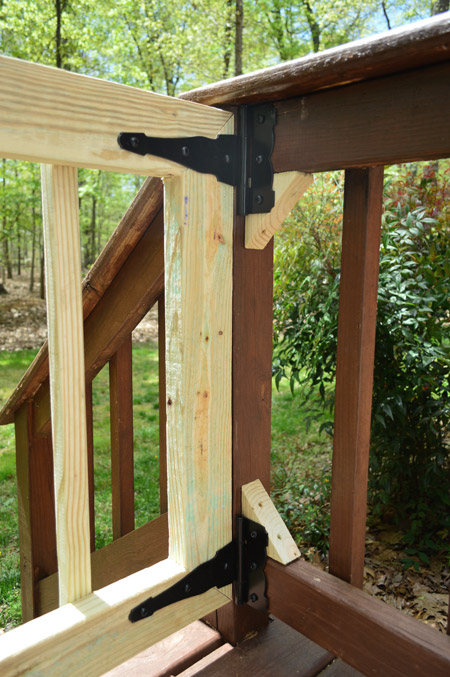
With the gate constructed, we just needed hardware to attach it. Home Depot sold this $15 kit that included two T-hinges and a latch, so I grabbed two of them. I had read in my research that a hinge should stretch about 1/5th the length of your gate. So these 8″ ones were just about perfect for our project.
To hang the gate, I used some scrap wood to prop it in place and (with Sherry’s help) determined the best spots to attach all of the hardware with of the provided screws. We couldn’t center the top hinge (it ran into the existing deck railing) so it rides a little low – but once the light wood is stained to match the rest of the deck we hope it won’t be too noticeable.
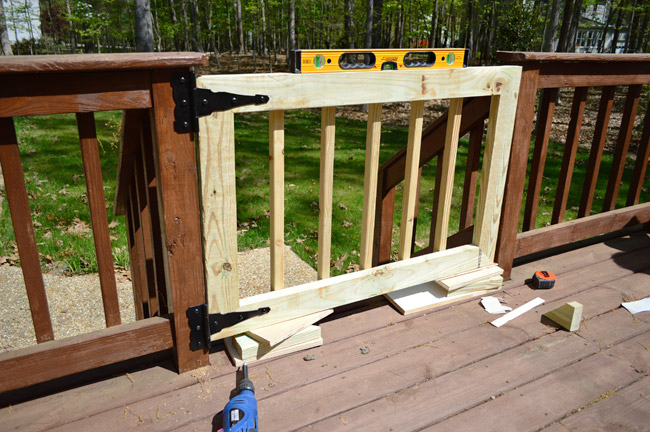
Then we just attached the latching mechanism to the other side, and we were in business.
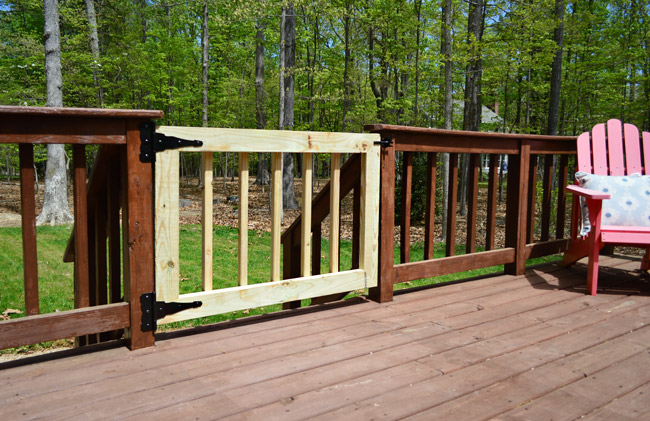
We still have some leftover stain from last year’s deck “rejuvenation” that will make the gates a perfect match, but we have to wait about 2-3 weeks before we can stain them (pressure treated wood can bubble or peel if you don’t let it dry out for a little while before staining or painting it). But regardless of the mismatched look, we’re just happy to have ’em up and functional. Especially since it only took about three hours to make both of them and my total cost was $53 for two gates ($23 for the wood and $30 for the hardware). File this project under “Why didn’t I do this last year???”
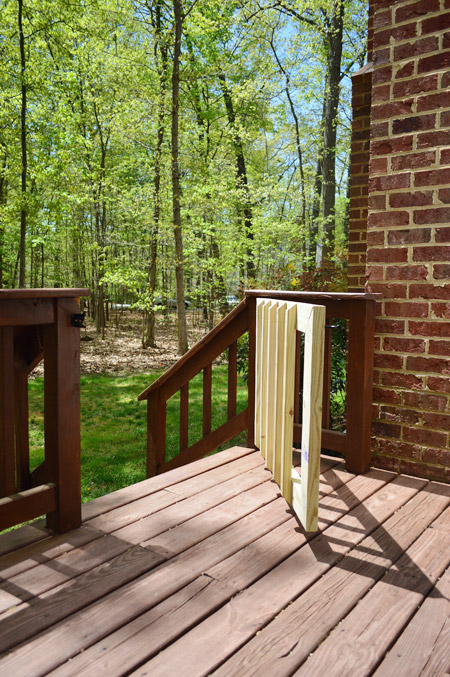
Here’s the gate on the other side. I used the same process, although the opening was a half-inch smaller than the other and – get this – an inch shorter! I guess the original railings get a little lower as they wrap around the deck.
The only extra challenge this gate presented was that I had to screw the hinge into the hand rail and foot rail, rather than the post. The hinge was too tall to fit entirely on it (we really wanted it to open in this direction, so hinging it on the other side didn’t make sense).
Thankfully it was a pretty easy remedy – I just screwed in a couple of scrap blocks (the initial mitered corners that I had sawed off) to give the hinge a place to attach. Obviously I’ll be staining those too, so they should blend in a lot more in a few weeks.
We’ll probably leave this side open most of the time, since this is where Burger exits to do his business, and just close it when he wants to linger on the deck. So we’re planning to add some sort of hook-and-eye latch to keep it propped open so it doesn’t swing in the wind or anything.
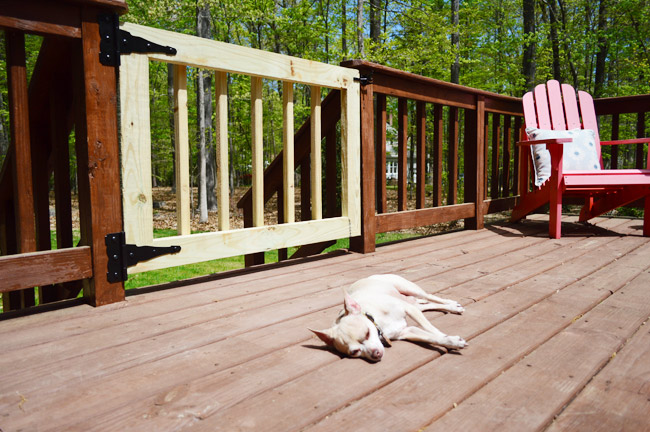
Sherry and I have been talking about eventually fencing some of the backyard so Burger can roam a bit more freely, but in the meantime he seems to love that he can warm his bare belly more often without us chasing him into the house.
Update: Thankfully, just like Burger can’t slip through the rest of the deck’s perimeter, he can’t get through the new gates. He’d have to leap into the air, clear the bottom frame and the balusters perfectly, and then land on the stairs below, and he’s just not that daring (he’s much happier to be lazy and bake in the sun). But a more brazen pup might be able to squeeze through if they’re small – and determined – enough, in which case I’d recommend closer spacing or adding some sort of a cross board.
And we figure we’ll probably be very grateful (gateful?) to have these once Teddy’s more mobile so we can keep him contained without having to worry about tumbles down the stairs. Parenting win!

Ah! That last photo! The time-honored pose of dog sunbathing…doggie prozac!
I just built a similar gate for my MIL’s porch. One thing I recommend doing is puttinfg a small stop block on the porch railing so that the block stops he swing of the gate, not the latch. Otherwise over time the jarring of the gate swinging shut causes the throw of the latch to pull right out of the gate.
That would be MUCH easier to describe with a photo, or with the proper gate terminology, but I think you can figure out what I mean.
Enjoy your baby snuggles, I soooo miss those days!
Smart!
xo
s
Oh John, these deck projects seem to chase you!
I would go mental without the gates + baby too!
Look at that sweet Burger laying in the sun! Love it!!
Love the concept of letting Burger sun outside alone. We’ve seen the deer but are there not any critters that could harm Burger? We live in a suburb outside of Los Angeles and have coyotes and hawks that wreck havoc on unattended small pets.
We had a fenced in yard in our first house and Burger would hang out there all the time without any issues. I think he’s too heavy for a bird of prey (a beefy 9lbs, haha!) and we don’t have coyotes or anything.
xo
s
Sherry, if you guys have hawks or owls in the area, nine pounds is not too much for them. I’m in suburban Chicago and we get stories every year about hawks taking off with small dogs and cats.
I’m paranoid, true, but would not leave a pet (or small child) out unattended – not that I think you do!
So scary! Thanks Linda!
xo
s
Very nice. We bought a house with a 2.5 acre unfenced yard. We cannot afford to fence it in with a nice, attractive fence. We live on a nice quiet street but there’s a lot of traffic at peak times because we’re also a pretty good road to take to get to the highway. Our house sits in the middle of the yard and we didn’t want our dog to even know there was a front yard to play in. We bought the underground fence and it is amazing. It isn’t a shock like a taser but more like you touched the car door and the static shock got you! We trained our dog on the boundaries without shocking for the first week, and then allowed her to get shocked while still on a leash if she didn’t listen to the warning beep while walking around the yard. I think 4 shocks is all she’s ever had and she never yelped or cried. She just shook her head and listened to the “no” I told her as she got too close to it. She realized what the boundary was and has never left the yard in 6 months… even while chasing deer out or playing with our neighbor kids that walk through to get to the playground. The underground fence took 4 hours to install and mostly that was figuring out where we wanted it. We upgraded the wire that came with the unit so it would withstand 20 years of underground pests. We rented a garden edger machine and it did the hole in 30 minutes for $60. It put a nice pile of dirt right next to the perfect size hole and we just brushed it back over the wire, put in the flags and started training! I know that your dog is little but they have collars designed for tiny dogs. Now, we give her a bath or something and let her outside without the collar and she still stays in the yard. She did awesome with it.
Thanks for the info Emily!
xo
s
I can load your website no problem, however it does seem odd…the post says it was put up on Saturday, April 26, which we both know is not true…
All fixed. That’s just a WordPress glitch that happens sometimes (it says the post was published on the date it was written instead of the date it was published).
xo
s
I feel like a lightbulb just went off for me! This is a great idea! We too like to keep our dogs on the deck in nice weather (we do have a fenced yard, but one dog sometimes finds a way to escape! so keeping them on the deck gives us peace of mind!) We’ve been using a baby gate to keep them up there, but it has taken a beating with weather and also, I don’t trust it to keep my kids on the deck when we are eating outside (if they push the baby gate, it could tip forward). This is a great solution to all of that….and I never thought of it! Thanks for inspiring us – we’ll be adding this to the to-do list this spring.
Rather than fencing off a section of your gorgeous yard with all the varying lovely views of nature, would you all consider an invisible fence to help contain Burger? Or are you worried about a Burger vs. deer encounter if he were allowed to freely roam the yard?
Yes, I think the deer and the whole shock thing wouldn’t sit well with us. We’ve also heard a few stories of dogs who run through their invisible fence, get a shock, and never want to come back in because they fear another shock, so they actually get trapped away from the house. Although I’m sure they work well for some families!
xo
s
I hear you on the electric fence, to each their own for sure. But since you have so many readers I wanted to let you know… I don’t know if other companies are the same way but Invisible Fence now has a fence where there is no “safe zone” on the other side.
My mom and dad have the old version, where if the dogs run through, once they are across the line by approx 10 feet (or are more than 10 feet inside of it), it stops the static. With the new fence, my dog can go right up to the line and not feel anything, but once he crosses, the only way to make it stop is for him to go back inside the yard, even if he goes 50 feet past. However if he is over the line for more than 30 seconds, it will stop for a little bit, but then start again if he isn’t where he belongs.
Hope that makes sense. I use the fence for my cats too, so if the fact Burger is small is a concern, it really is ok for the little guys (one of my cats is only 8 lbs)
I don’t work for the company I mentioned, just wanted to let people know that there is newer technology out there.
Thanks for the info Cathy!
xo
s
This is awesome! I also love how you guys just go right into tackling projects yourself, which is why yours is one of my favorite blogs. Also, to comment on your earlier post about cutting back: Congratulations on your growing family and constantly reinventing yourself. We will all be here :)
I was wondering how you thought the deck staining/refinishing is holding up? Please don’t think I’m being negative but it looks like the railing is holding up better than the floor of the deck? I’m only curious of anything y’all would have done differently, my husband and I are getting ready to “clean”, stain and seal our deck and would love to know your thoughts/tips. Thanks!
The floor of the deck is just a little lighter and less opaque because we stripped it completely (for the railings we did some stripping, but also just left a lot of the previous stain color since we were matching it and just went over it with a fresh coat). So the best explanation would be that two coats are on most of the railings and the deck is a lighter/less deep tone since it’s just one coat. They’re all water protected though (it beads up on both surfaces), and we’ve been happy with it so far.
xo
s
You guys should look into WamBam fencing. Super easy diy (and the people at the company are really nice and helpful). We installed both a metal fence in our front yard and white vinyl in our back.
Thanks Beth!
xo
s
I love Burger posts!!! Can you guys think up more projects for Burger so we can see him more? I’m going to do this with my front porch, that way our little dog can go out in the summer and bake in the sun, too.
Our little chihuahua was a stray/rescue, found on the mean streets of Toronto, and I think I know why – as soon as the front door is open (our backyard is fenced luckily) she bolts. Luckily we live on a dead end but cars and coyotes can still be an issue so we use a spring loaded baby gate because at the moment the stair bannisters are metal. I always have to explain that the baby gate is actually not for our toddler (who now knows how to work the safety latch anyways) – lol! Congratulations btw on little Teddy! He is adorable!
Hi Guys,
I don’t know if anyone has already mentioned this (I can’t possibly read all the comments. how do you do it??) — but, most building codes require the slats to be 4 inches off center to meet code. With the baby you might want to fix the deck as a whole so his head doesn’t get stuck!
A few years ago, my husband put gates like these on our deck and they have been so awesome!! Luckily our deck was large enough to be able to hold some riding toys and a small sandbox. This was especially great after we had our last baby. I could be in the house doing baby-related stuff while my 3 year old played out on the deck. I knew he was safe and it made me happy that he was outside even when I was stuck inside.
I’m really impressed that Burger won’t go through the slats! My dog (who’s ~10.5-11 lbs) totally would. When there’s a will, there’s a way with that crazypants canine. Go Burger!
Looks great guys! Honestly, the thing that I am most jealous of right now is that your trees have leaves! Can you believe that spring is so late this year in Maine that the trees have not even started to bud leaves! Can it just be spring already!! :)
Wow, that seems pretty easy and it looks great! For some reason building things makes me hesitate. We just bought our first circluar saw and I’m terrified to use it!
Dogs are funny. I have a 75 lb lab that can be kept contained by a baby gate propped against a door- when she could easily just push it over. It can even be only covering the doorway 1/2 way and she won’t even try to sneak around it!
So funny!
xo
s
Ah, I wish I was that handy…
Sarah
http://www.sarahsdaybook.wordpress.com
Good, solid project. This is the kind of project I love from you guys.
I’ve always wanted a porch with a gate – is that weird? Although, if we had one, I’m sure my mini dachshund would still attempt to jump it! She has jumped 4 foot gates and pushed tables/chairs out of her way to escape confinement. That Burger must be one obedient pup!
I’m still so impressed with how far your carpentry skills have come from the early days of owning barely more than a set of screwdrivers. Such a neat, well finished project. Nice one John! I really ought to get my husband some more grown up tools…
Great gate, great read.
But before you stain them, code for maximum baluster distance is 4 inches. With a crawler/toddler in the house it might be a good idea to just add an extra and shrink that spacing a bit. I understand the rest of the deck will still be too wide, but at least the gate where he’ll be trying to get through will be less of a strangulation risk.
Thanks Annie! Teddy’s head is already 4.5″ so we’re certain by the time he’s mobile it’ll be 6″+ and not at risk for getting stuck, but if he gets close to being mobile and we’re off on that and we worry it’ll get stuck we’ll absolutely rebuild the gate with closer slats to make sure he’s safe :)
xo
s
It’s not just strangulation hazards to need to watch out for. When I was four years old I fell going down the stairs in our house, and my leg got stuck between the rails of the staircase and my Dad had to saw the railing off. It was really traumatic for me and my leg was really swollen and bruised by the time I was freed. I would rather make sure you’re following the current code to avoid injuries for Clara and Teddy, rather than making it look ‘good.’
Yikes, thanks for the tip G!
xo
s
Annie, you have a great point! Sherry, I’d think you’d be surprised to find out how kiddos can get themselves stuck. It’s akin to putting a ring on your finger – it’ll slide on just fine, then when you go to take it off it won’t go past the knuckle again. Maybe that’s where “knuckle-head” comes from – ha! And let’s not forget the whole “boy” factor…..
Just do a Google search of “images of kids heads getting stuck”.
Yes, that’s why the code is not more than 4 inches. Their body slips through, but their head does not. The weight of your body hanging by your chin is enough to snap your spinal cord (google internal decapitation and think of how hanging works).
To restate, because it’s an important point…
If the gap is wide enough for the body, but not wide enough for the head the child can either die from the force of the initial weight of their body falling through the rails pulling their spinal cord out of their brain (because their vertebrae are not fused until 3), their spine can snap from that initial jerk from the weight of their body or they can more slowly strangle if their whole body is hanging from their neck.
For a crib both the minimum and maximum distances are very important, but for a deck the max distance is most important.Getting a leg or arm stuck in a deck if the the rails are too close is scary and possibly painful, but not lethal.
The fix is easy, just pop an extra balustrade in each gap.
The best result to back up what I’m saying (giving reasons, not just dimensions) was a google book so I can’t C&P, but if you google “head entrapment” it should come up for you. Once you find out the reason for the code it makes sense.
Thanks for the info Annie! Very good to know!
xo
s
Of the 4 boys and 8 girls my siblings and I have managed to produce, 2 of the boys and 0 of the girls have managed to get themselves stuck between fence rails. My nephew’s case required the fire department to come cut the metal rail. Looking at the fences, I cannot figure out how their heads ever fit, but there you are. Boys are a different kettle of fish. On the other hand, 2 of the boys did NOT get stuck.
“Why didn’t [you] do this last year??” Um, showhouse! Teddy! Target collection! Blue trim, hardwoods, wallpaper, kitchen, etc! It’s been a busy year for the Petersiks, give yourself a break. :)
I am SO happy that our tutorial was helpful! My sister has had the gate that she built up for over 2 years now and it’s still perfect! She uses hers to contain her 2 year old and her three dogs.
Have a great week!
We did the same thing to our deck for our dog (a chihuahua mix about 5lbs bigger than burger). One day while I was standing just inside the door, I was SHOCKED to see three eagles (hawks?) circling our deck. I think they were thinking our pup might of made a nice snack since they are known for picking up small dogs and cats. I know it sounds silly but just wanted to give you a little heads up in case you have birds such as those indigenous to your area :)
Eeks, thanks Melissa!
xo
s
I’d second this… we have friends that live about 15 minutes south of you all, and they lost at least half their chickens to hawks. These were large birds, and weighed about the same as Burger.
Oh yes! And owls too :( I was shocked to hear that a neighbor lost their cat due to an owl. We’re up in Western New York, so hopefully not an issue out in RVA.
love that burger doesn’t think he could make it through. but glad for you guys that he has that mentality.
folks — please don’t do an electric fence. I’ve seen several of my neighbors do it — the minute shock on the dog — only lasts for a second, and the dog usually keeps escaping. it’s not a deterrent at all! and it doesn’t keep outside animals from coming in the yard. It’s not a solution!
Haha Burger sounds like my dog Riley (Rip sweet girl). All we had to do was put a rope up or even twine…seriously…and she wouldn’t pass it. And I mean you could lay it across the floor. It was equal parts hilarious and crazy convenient. She was about 35 pounds and part basenji with super long legs. Clearly able to jump a 6 ft fence but she would just dance around anything that seemed like a barrier.
Hilarious!
xo
s
I think God was giving us a break from my very first dog haha. We found her running around a park and kept her when the owners said they were just going to euthenize her because they couldn’t handle her jumping the fence. She was about 8 months old (lived to be 16!) and was a lab greyhound mix. We had to put a small wire current (nothing but a small shock) and that’s what it took to stop the jumping!
I can’t beleive the timing on this. I just finished staining my deck this weekend and this is the next thing on my to-do list! Now I don’t even have to think about how to do it, I’ll just follow your plan. Thank you so much!
This is such a good idea! I was just thinking about how we’ll have to lug out the baby gate to enjoy our deck this spring/summer. Will have to bring this up to hubby! (Not that he’ll be building it. ;-))
Great Looking Gate!
We build something similar at the bottom of our stairs at our home. It just worked out because of the way they ended. BUT! To keep the gate from swinging (and in the baby rooms) we used these magnetic doorstops. We found them at our local home store and since them I’m converted! No little fingers caught in swinging doors, and they hold the gate firmly too! I’m not sure how it would hold up outdoors, but you could mount the pieces under the deck railing to protect them. Good Luck!
Also! I’m so glad that you guys are making the time for family. I LOVE YHL. I appreciate that you’re cutting back on the number of posts instead of the quality of them. Great job guys! And snuggles to both of your little ones!
~~Alie
Looks great! I like the hardware on it too! my parents have something similar, but we just pick it up and put it in the spot when their dog goes on the deck. I’ll have to show them this post. When I got my dog, we discovered that a smaller/bolder dog can get through the slats. We put chicken wire in the slat area and we haven’t had problems since.
We built a similar gate for our deck a couple of years ago, and have a persistent problem of its weight causing the post to lean slightly. We tried reinforcing the post with some extra hardware, but our gate still gets wedged shut, requiring us to lift up slightly before opening it. Not a big deal, except when carrying a 4 year old or a tray full of s’mores. Or both. Any tips on how your posts are secured?
Our deck posts go into ceramic footers since they hold weight and support the deck boards. Maybe digging around your posts and pouring concrete around them will help stabilize them?
xo
s
This looks great! I have been so inspired by reading your DIY adventures over the past few years – there was a time when I would have been terrified of buying an old house, but now we’ve done it and are gradually fixing it up! And thanks for teaching the world the transformative power of white paint on cabinets – our kitchen cabinets were orange and green when we got our house, yikes! But looking much better now:
http://http://functionaladult.blogspot.com/2014/04/fifty-shades-of-white.html
Liz, you have 2 http’s in your link – had to copy it, paste it, and erase one to go be nosy. Man, when you said de-orangified, you weren’t kidding! I thought it was just orangey oak, but the previous owners took orange to a whole new level.
Loving the plywood. We actually did this with our 60lb mutt who likes to run into the road. But she has this weird thing that if there is anything blocking she wont. Even though she could easily jump it! Lucky I guess!
Dear Sherry:
Once again, I ask you for your husband.
There are no men around here that can “build things”. I am willing to work out a sharing compromise, but I feel that as I am a good 25 years older than you, my building needs trump yours. Seeing as you are busy with two children and have taken a pause in your own home, I assume John might be free for a few weeks.
Please let me know what flight he will be on. I will return him when the jobs are finished. Oh, and my chihuahua would like to meet Burger, so he can come too.
PS: You can visit.
Regards,
A very jealous reader
PSS: You know I’m joking, right? But boy, I sure could use John (or a brother, father or cousin!)
Haha! He’ll be there by 4pm (holding all the tools he can carry on).
xo
s
So glad you posted this – I’ve been thinking of making a deckgate or our little dog so she doesn’t get too curious! Great step by step!
Great solution and it looks so professionally done! Love the pic of Burger sunning his cute self!
Very nice! You might also need a tension wire to help keep your gate from sagging. Especially since it’s long. We had sagging issues with our gate which wasn’t very big and the tension wire helped fix it.
Thanks Meghan!
xo
s
Looks great (and professionally done!)! Are you planning on staining it or leaving it light?
Yup, that info’s in the post for ya :)
xo
s
What a great project! For those with less-well-behaved pups: On our deck gates, we stapled chicken mesh (screen would work too) to keep our pup on the right side of the gate while maintains the spacing on the rail. Less jarring visually than cross-members when the rest of the rail has none….
Great job! Burger is loving it that’s for sure!
I have to say – when I glanced at the first several pictures, I totally misread “Balusters” as Ballbusters.
So then I speedily scrolled back up to see what shenanigans I had missed- only I didn’t miss any, I just can’t read.
whomp whomp.
So I’m reading this the day after I had to hop our 6 ft back fence to retrieve my 45 lb dog, who has learned to climb the fence. And it isn’t just her- the 75 lb one is so very close, thank goodness his back legs are so muscular that the weight keeps him from going over (so far). Let’s just say my slightly scraped knee and I have some serious small dog envy happening right now. ;) Great looking gate!
Yeah for lazy pets! :) The gates look great! Very professional! I am glad we have a lazy cat….but to be fair, she also has leg issues from a pretty horrific start in life, she is a rescue cat…and pet proofing has been pretty easy with her..no jumping, etc. I am still glad to see this project for the future with a new puppy in the plans….
Looks great! My parents have a gate on their deck and it is so nice to have that piece of mind when we are over visiting with our son.
It must be a gate-building weekend! My husband built and hung a gate for our pass-through garage door. The previous owners built a smaller garage door on the back of the garage that has access to the backyard. It’s great for easy access to all the lawn and gardening tools in the garage, but it’s not so great for a curious toddler and two dogs. Now we can keep the door open without worrying about any pint-size trouble!
What an awesome idea! So jealous that Burger doesn’t try to squeeze himself through the rails/balusters. Chloe is a skinny little Min Pin with just about zero recall, so I could never let her out in the yard without her being attached to her big lead. She easily fits between the balusters.
I’ll take a sun-baked Burger with Swiss & mushrooms, please. Ahhh, Burger’s living the good life.